System Design for Beginners: How to Start With HLD and LLD
System design fundamentals for beginners
On this page
- Introduction
- What System Design Actually Is
- High Level Design (HLD)
- Low Level Design (LLD)
- Why Beginners Should Learn Both
- HLD Fundamentals, Fully Expanded
- How a Request Actually Reaches a Server
- Latency and Throughput
- Scaling and Its Types
- Auto Scaling
- Back of the Envelope Estimation
- Load Balancers, In Depth
- Databases, SQL vs NoSQL
- When to Use Which Database
- Scaling a Database
- Caching, In Depth
- Content Delivery Networks, CDNs
- Message Queues and Asynchronous Processing
- The CAP Theorem
- Proxies, Forward and Reverse
- How to Approach an HLD Problem, Step by Step
- Step 1: Clarify the Requirements
- Step 2: Estimate the Scale
- Step 3: Define the Core Components
- Step 4: Design the Data Flow
- Step 5: Identify Bottlenecks and Failure Points
- Step 6: Discuss Tradeoffs
- LLD Fundamentals, With Java Examples
- 1. Object Oriented Programming, The Foundation of LLD
- 2. SOLID Principles, With Code
- 3. Design Patterns, With Code
- UML and Class Diagrams
- Why UML Matters, Even Though It Feels Like Extra Work
- The Building Blocks of a Class Diagram
- The Relationships Between Classes
- Multiplicity, Describing How Many
- A Worked Example
- Common Beginner Mistakes with UML
- Tools for Drawing UML Diagrams
- How to Approach an LLD Problem, Step by Step
- Step 1: Clarify the Requirements
- Step 2: Identify the Core Objects, or Entities
- Step 3: Define Relationships Between Objects
- Step 4: Identify Behaviors and Assign Responsibilities
- Step 5: Apply Relevant Design Patterns
- Step 6: Sketch It Out Before Coding
- Step 7: Write Clean, Incremental Code
- Step 8: Handle Edge Cases
- A Beginner's Practice Roadmap
- Stage 1: Build the Vocabulary First
- Stage 2: Study Simple, Well Known Systems
- Stage 3: Attempt Your Own Designs, Badly at First
- Stage 4: Move to LLD in Parallel
- Stage 5: Study Harder, More Specific Systems
- Stage 6: Practice Explaining Your Design, Not Just Building It
- A Note on Pacing
- Ending Notes
Introduction
If you have ever opened a system design article and immediately felt lost, you are not alone. Most resources jump straight into complex diagrams full of load balancers, message queues, and databases without ever explaining why any of it matters or where to even begin.
This guide is written for that exact situation. It assumes no prior knowledge of system design. By the end, you will understand what High Level Design (HLD) and Low Level Design (LLD) actually mean, how they are different, what concepts you need to learn for each, and how to start practicing both without feeling overwhelmed.
This is not a shortcut to becoming a system design expert overnight. It is a map. A map that tells you where to start, what to learn next, and why each piece matters.
What System Design Actually Is
At its core, system design is the process of deciding how a software system should be structured so that it works correctly, handles the expected load, and can grow over time without falling apart.
Think about an app like Instagram. Millions of people upload photos, scroll through feeds, and send messages every second. None of that happens by accident. Someone had to make deliberate decisions about how data moves through the system, where it is stored, how it is retrieved quickly, and what happens when a part of the system fails.
System design is split into two major categories, and understanding this split early will save you a lot of confusion.
High Level Design (HLD)
HLD is the big picture view of a system. It answers questions like:
- What are the major components of this system
- How do these components talk to each other
- Where does data get stored, and why that choice
- How does the system handle millions of users instead of just a few
- What happens when something breaks
If someone asked you to design Twitter at a high level, you would be thinking about things like how tweets get stored, how the news feed gets generated for millions of users, and how the system stays fast even under heavy load. You would not be thinking about class structures or specific functions yet. That comes later.
Low Level Design (LLD)
LLD is the detailed, code level view of a system. Once you know the big picture, LLD answers questions like:
- What classes and objects should exist
- How should these classes interact with each other
- What design patterns make this code flexible and maintainable
- How do you structure the code so it is easy to extend later without breaking everything
If HLD is the blueprint of a building, LLD is the detailed plan for how each room is wired, plumbed, and finished. Both are necessary. A building with a great blueprint but poor internal wiring will still fail, and so will a system with strong architecture but messy, unmaintainable code.
Why Beginners Should Learn Both
A common mistake beginners make is picking one and ignoring the other. Some focus entirely on HLD because it feels more exciting, full of buzzwords like Kafka, Redis, and Cassandra. Others focus entirely on LLD because it feels closer to actual coding.
The truth is that real systems need both. A well designed architecture with poorly structured code becomes painful to maintain. Clean code sitting on top of a broken architecture will not scale. This guide treats HLD and LLD as two halves of the same skill, because that is exactly what they are.
HLD Fundamentals, Fully Expanded
How a Request Actually Reaches a Server
Before diving into load balancers and databases, it helps to understand what physically happens when you type a website address into your browser, because almost every HLD concept builds on top of this flow.
A server is just a machine, physical or virtual, that runs your application code and waits for requests. When you type something like www.example.com into your browser, your computer does not know where that server actually lives. It first goes to a DNS server, short for Domain Name System, which works like a phone book for the internet. DNS translates the human readable name, example.com, into the server's actual IP address, something like 142.250.196.14.
Once your browser has the IP address, it sends the request directly to that address. The server has many programs potentially running on it at once, so the request also specifies a port number, which tells the server which specific application should handle it. Port 443 is the standard port for secure web traffic, port 80 for regular web traffic. The server receives the request on that port, processes it, and sends a response back the same way.
This whole round trip, from your browser sending the request to receiving the response, is the foundation everything else in system design tries to optimize. Every concept you learn after this, caching, load balancing, CDNs, exists to make this loop faster, more reliable, or able to survive more traffic.
Real world example: When you search something on Google, your browser first resolves google.com to an IP address through DNS, then sends the request to that IP on port 443. Google's servers receive it, process your query across their search infrastructure, and send back a response that your browser renders as the results page you see.
Latency and Throughput
These two words get thrown around constantly, and beginners often confuse them, so it is worth separating them clearly.
Latency is the time it takes for a single request to complete, usually measured in milliseconds. If you click a button and the page updates in 200 milliseconds, that is your latency for that action. Lower latency means a snappier, more responsive experience.
Throughput is how many requests a system can handle in a given period of time, usually measured as requests per second. A server might handle 5000 requests per second before it starts struggling. That number is its throughput.
Here is a way to keep them straight. Imagine a highway. Latency is how long it takes one specific car to get from one end to the other. Throughput is how many cars can pass through the highway in an hour. A highway can have low latency for individual cars but still have low throughput if it only has one lane. Ideally, in system design, you want both, fast individual requests and the ability to handle a large volume of them at once.
Real world example: A stock trading platform cares intensely about latency, since even a 50 millisecond delay in executing a trade can cost a firm money. A bulk email service, on the other hand, cares more about throughput, since it needs to send millions of emails over a few hours, and a slightly slower individual email does not matter much.
Scaling and Its Types
As your application gets more users, at some point your existing setup cannot keep up, and the system needs to scale. There are two fundamental ways to do this.
Vertical scaling means making your existing server more powerful. You add more CPU, more RAM, or faster storage to the same machine. This is simple because your application logic does not need to change at all, you are just running it on stronger hardware. The problem is that vertical scaling has a ceiling. There is a physical and financial limit to how powerful a single machine can get, and eventually you cannot scale vertically anymore.
Horizontal scaling means adding more servers instead of making one server stronger, and spreading incoming traffic across all of them. This scales much further than vertical scaling, but it introduces complexity, because now you have multiple servers that need a way to share the load, which is exactly where load balancers come in.
As a general rule, most beginners should default to thinking horizontally when designing large systems, since almost every major platform you use daily, from Instagram to Amazon, runs on a horizontally scaled fleet of servers rather than one giant machine.
Real world example: A small SaaS startup with a few hundred users might comfortably run on a single, reasonably powerful server, scaling vertically as needed. Once that same startup grows to millions of users, like Slack or Notion did, a single server becomes physically impossible to scale further, forcing a move to horizontal scaling across many servers.
Auto Scaling
Traffic to most applications is not constant. A food delivery app gets far more traffic during lunch and dinner hours than at 4 in the morning. If you provisioned enough servers to handle your absolute peak traffic and kept them running at all times, you would be paying for a lot of unused capacity during quiet hours.
Auto scaling solves this by automatically adding or removing servers based on real time demand. If CPU usage across your servers crosses a certain threshold, say 80 percent, the system automatically spins up additional servers and starts routing traffic to them. When traffic drops back down, those extra servers get shut down automatically to save cost.
This is why cloud platforms like AWS, GCP, and Azure are so widely used, they let you configure these rules once, and the infrastructure handles the scaling up and down without anyone manually watching dashboards at 2 in the morning.
Real world example: Ticket booking platforms like BookMyShow or Ticketmaster see massive traffic spikes the moment tickets for a popular concert go on sale, followed by near silence afterward. Auto scaling lets them spin up extra servers only during that sale window, then scale back down afterward, instead of paying for peak capacity all year round.
Back of the Envelope Estimation
Before designing a system, especially in an interview setting, it helps to roughly estimate the scale you are designing for. This does not need to be precise, the goal is just to understand the order of magnitude you are dealing with.
Let us say you are designing a photo sharing app with 50 million daily active users, and each user uploads 2 photos a day on average. That gives you roughly 100 million photo uploads per day. If each photo averages 3 megabytes, that is around 300 terabytes of new storage needed every single day. Suddenly, a decision like "should we use a regular database to store photos" becomes obviously wrong, and it naturally leads you toward using dedicated object storage instead.
This kind of quick math does not need to be perfect. Its entire purpose is to force you to confront the actual scale of the problem early, so your design decisions are grounded in reality rather than guesswork.
Let us fully work through the numbers instead of just estimating in our head, using the same photo sharing app example.
Given:
- 50 million daily active users
- Each user uploads 2 photos per day
- Each user views 100 photos per day
- Average photo size is 3 MB
- 10 percent of photos also get a comment
Step 1, Calculate Daily Writes
Total photo uploads per day = 50,000,000 users x 2 photos
                             = 100,000,000 uploads per day
Step 2, Calculate Daily Reads
Total photo views per day = 50,000,000 users x 100 views
                           = 5,000,000,000 views per day
This alone tells you something important, reads outnumber writes by 50 to 1, which is a strong signal that caching and read replicas will matter far more here than optimizing for writes.
Step 3, Calculate Storage Needed Per Day
Storage per day = 100,000,000 uploads x 3 MB
                = 300,000,000 MB
                = 300 TB per day
Step 4, Calculate Storage Needed Per Year
Storage per year = 300 TB x 365
                  = approximately 109,500 TB
                  = approximately 109.5 PB per year
Step 5, Calculate Requests Per Second
Uploads per second = 100,000,000 / 86,400 seconds in a day
                    = approximately 1,157 uploads per second

Views per second = 5,000,000,000 / 86,400
                  = approximately 57,870 views per second
What this tells us:
With numbers like these, a single database server is immediately ruled out, both for storage and for request volume. The huge gap between read and write volume tells us to invest heavily in caching and CDN delivery for photos, while the storage volume tells us photos themselves belong in dedicated object storage like S3, not inside a traditional database. This is the entire point of back of envelope math, it turns vague scale into concrete architectural decisions.
Load Balancers, In Depth
Once you have multiple servers, something needs to decide which server handles each incoming request. That is the load balancer's job, and it sits right in front of your fleet of servers.
There are several common strategies a load balancer can use.
Round robin sends requests to servers one after another in a repeating cycle, server one, then server two, then server three, then back to server one. It is simple and works well when all your servers have similar capacity.
servers = [server1, server2, server3]
currentIndex = 0

function getNextServer():
    server = servers[currentIndex]
    currentIndex = (currentIndex + 1) % length(servers)
    return server
Least connections sends each new request to whichever server currently has the fewest active connections. This works better than round robin when some requests take much longer to process than others, since it avoids piling more work onto a server that is already busy with long running requests.
servers = [server1, server2, server3]
activeConnections = { server1: 4, server2: 1, server3: 7 }

function getNextServer():
    return server with minimum value in activeConnections

    // after routing a request to that server:
    activeConnections[chosenServer] += 1

    // once that request finishes:
    activeConnections[chosenServer] -= 1
IP hashing generates a value based on the client's IP address and consistently sends that client to the same server every time. This matters for cases where a server temporarily holds information specific to that user's session, and you need their requests to keep landing on the same machine.
A concrete example, if a food delivery platform suddenly gets a huge traffic spike because of a big promotional sale, the load balancer is what prevents that spike from overwhelming any single server. Instead of one server trying to handle everything and crashing, the load balancer spreads the incoming rush across dozens of servers running in parallel, keeping the app responsive for everyone.
Real world example: Amazon's Elastic Load Balancer sits in front of thousands of backend servers during events like Black Friday, distributing incoming shopping traffic so that no single server handling checkout requests gets overwhelmed while others sit idle.
Databases, SQL vs NoSQL
Choosing the right kind of database is one of the most consequential decisions in system design, and it usually comes down to two broad categories.
Relational databases, like PostgreSQL and MySQL, organize data into structured tables with predefined columns and strict relationships between tables. They enforce something called ACID properties, which guarantee that transactions are processed reliably even if something fails midway. This makes them a strong fit for situations where correctness matters more than raw write speed, like storing a user's bank balance or an ecommerce order history, where you absolutely cannot afford inconsistent or lost data.
NoSQL databases, like MongoDB, Cassandra, or DynamoDB, trade some of that strict structure and consistency for flexibility and massive write throughput. They do not require a fixed schema, meaning you can store records with different fields without redefining a table structure every time. This makes them a strong fit for high volume, less strictly structured data, like a social media feed, chat messages, or sensor data from millions of devices.
When to Use Which Database
Knowing that SQL and NoSQL exist is not enough. The real skill is knowing which one fits a given situation, and that decision usually comes down to a handful of concrete questions you should ask about your data.
Ask: Does my data have complex relationships?
If your data naturally involves multiple related entities that need to be joined together, like users, orders, products, and payments in an ecommerce system, a relational database is usually the better fit. SQL databases are built specifically to handle joins efficiently and to keep related data consistent through foreign keys and constraints.
If your data is mostly self contained, like a single document representing a user's profile with no need to constantly join it against other tables, a NoSQL document database like MongoDB often fits more naturally.
Ask: Do I need strict consistency, or can I tolerate eventual consistency?
If incorrect or stale data could cause real harm, like showing the wrong account balance or double charging a customer, you need strong consistency, which points toward a relational database with ACID guarantees.
If slightly outdated data is harmless, like a like count on a post briefly lagging behind, or a follower count being off by a few for a moment, NoSQL's more relaxed consistency model is an acceptable tradeoff in exchange for better performance and scalability.
Ask: What does my read and write pattern look like?
If your system is read heavy, with the same data being queried repeatedly in complex ways, like generating financial reports, SQL databases with strong indexing and query optimization tend to perform very well.
If your system is write heavy, with enormous volumes of data being inserted constantly, like tracking millions of location pings from delivery drivers every few seconds, NoSQL databases like Cassandra are built specifically to absorb that kind of write load far better than a traditional relational database.
Ask: How much will my schema change over time?
If you know your data structure well in advance and it is unlikely to change much, like a banking system's account and transaction tables, a fixed schema in a SQL database gives you safety and predictability.
If your data structure is still evolving, or different records naturally have different fields, like a product catalog where some products have five attributes and others have twenty, a flexible schema NoSQL database avoids painful migrations every time the structure needs to change.
Ask: How large does this need to scale?
If your system will realistically stay within the capacity of a single well provisioned server, even with some vertical scaling, SQL remains an excellent, simpler choice.
If you are building for a scale where the data physically cannot fit or be processed efficiently on one machine, like a social media platform with billions of posts, NoSQL databases are generally designed from the ground up for horizontal scaling across many machines, making them a more natural fit at that scale.
A Quick Reference Table
| Situation | Better Fit |
|---|---|
| Banking transactions, account balances | SQL |
| Ecommerce orders and payments | SQL |
| User profiles with flexible fields | NoSQL |
| Social media posts, likes, comments | NoSQL |
| Real time location tracking | NoSQL |
| Complex reporting with many joins | SQL |
| Product catalog with varying attributes | NoSQL |
| Inventory management with strict accuracy | SQL |
| Chat messages at massive scale | NoSQL |
| Financial audit logs | SQL |
A Common Real World Pattern: Using Both Together
It is worth knowing that most large systems do not pick just one. They use SQL and NoSQL side by side, each for the part of the system it fits best.
A ride sharing app is a good example. User accounts, driver verification, and payment records, where correctness truly matters, typically live in a relational database. Meanwhile, live driver location updates, which arrive constantly and do not need strict relational structure, are often handled by a NoSQL store or an in memory system built for high write throughput. Search functionality across the platform might even use a separate specialized system like Elasticsearch, since neither SQL nor typical NoSQL databases are optimized for fast, flexible text search.
The lesson here for beginners is that choosing a database is not a single, one time decision for your entire system. It is a decision you make separately for each part of your system, based on what that specific piece of data actually needs.
Scaling a Database
A single database server can only handle so much before it becomes a bottleneck. There is a natural progression of techniques used to scale a database as load increases.
Indexing is usually the first and simplest step. Without an index, a database has to scan through every single row to find what you are looking for, which is slow once a table has millions of rows. An index is a separate, sorted structure built on a specific column that lets the database jump almost directly to the matching rows instead of scanning everything. The tradeoff is that indexes take up extra storage and slightly slow down writes, since the index also needs updating whenever data changes.
Partitioning means splitting one large table into smaller tables, but keeping them on the same database server. If you had a users table with 500 million rows, you might split it into multiple smaller tables based on user ID ranges. This keeps each individual table, and its index, smaller and faster to search.
Master-slave replication, also called leader-follower replication, comes into play when a single server cannot handle the read traffic anymore. In this setup, one server, the master, handles all write operations. That data gets copied to one or more other servers, called slaves or replicas, which handle read operations. Since most applications receive far more reads than writes, this lets you scale read capacity by simply adding more replica servers.
Multi-master setups go a step further by allowing more than one server to accept writes. This is common in systems serving users across different regions, where, for example, one master handles writes from users in Asia and another handles writes from users in Europe, and the two periodically sync with each other. The tricky part here is handling conflicts, deciding what happens if the same record gets updated differently on both masters before they sync.
Sharding is the most complex scaling technique, and it should generally be a last resort. Sharding splits your data across entirely different database servers, called shards, rather than just different tables on the same server. A social media platform with billions of users might shard its user data by user ID, so users with IDs in one range live entirely on one physical database server, and users with IDs in another range live on a completely different server. This lets you scale almost infinitely, since you are no longer limited by a single machine's capacity, but it makes operations like joining data across shards expensive and complicated, since that data now lives on physically separate machines.
Real world example: Instagram famously sharded its PostgreSQL database early on to handle its explosive user growth, splitting user data across multiple database servers based on user ID, rather than trying to keep scaling a single massive server vertically.
Caching, In Depth
Caching stores frequently requested data somewhere fast to access, usually in memory using tools like Redis or Memcached, so that repeat requests do not need to hit the database every single time.
Think about a news website's homepage. Thousands of people might load that homepage every minute, but the content on it does not change every second. Instead of querying the database and rebuilding that homepage from scratch for every single visitor, the rendered homepage gets cached, and the next several thousand visitors are served that cached version almost instantly.
Caching happens at several different layers. Client side caching stores data directly on the user's device, like a browser caching a website's images so it does not have to redownload them on every visit. Server side caching stores data in a fast, shared layer like Redis that all your application servers can read from. CDN caching, which we will cover next, stores copies of content geographically closer to users.
The hardest part of caching is not storing the data, it is knowing when to update or remove it, a problem called cache invalidation. If a product's price changes on an ecommerce site, but the old price is still cached, users might see outdated information. A common approach is setting a time to live, or TTL, on cached data, meaning it automatically expires and gets refreshed after a set period, like 10 minutes. Another approach is updating the cache immediately whenever the underlying data changes, so the two never fall out of sync in the first place.
Real world example: When you check a cricket score or a live sports score on an app, that score is being read by millions of people at the same moment but only updated occasionally. Caching that score in Redis for a few seconds at a time massively reduces database load compared to querying the database on every single refresh.
Here is a simplified example of how a server might check Redis before hitting the database, using Node.js.
const express = require('express');
const redis = require('redis');
const app = express();
const client = redis.createClient();
client.connect(); // node-redis v4+ needs an explicit connect before commands

app.get('/photo/:id', async (req, res) => {
    const photoId = req.params.id;
    const cacheKey = `photo:${photoId}`;

    // Step 1: check the cache first
    const cachedPhoto = await client.get(cacheKey);
    if (cachedPhoto) {
        console.log('Cache hit');
        return res.json(JSON.parse(cachedPhoto));
    }

    // Step 2: cache miss, fetch from database
    console.log('Cache miss, querying database');
    const photo = await database.getPhotoById(photoId);

    // Step 3: store in cache for next time, expire after 1 hour
    await client.set(cacheKey, JSON.stringify(photo), { EX: 3600 });

    return res.json(photo);
});
Content Delivery Networks, CDNs
If your main servers are located in one region, users far away from that region will experience noticeably slower load times, simply because their requests have to physically travel farther. A CDN solves this by storing copies of static content, images, videos, stylesheets, on servers distributed around the world, called edge servers.
When a user requests a piece of content, their request goes to the nearest edge server rather than all the way back to your main server. If that edge server already has the content cached, it returns it immediately. If not, it fetches it once from your main server, caches it, and serves it to that user and every future user in that region from then on.
This is exactly why video streaming feels smooth regardless of where you are in the world. When you press play, you are very likely streaming from a server physically close to you, not from the platform's main data center on another continent.
Real world example: When you download a large game update from Steam, you are almost certainly downloading it from a CDN edge server near your city, not from Steam's main servers, which is why download speeds are usually very fast regardless of where you live.
Message Queues and Asynchronous Processing
Not every task a system performs needs to happen instantly while the user waits. Some tasks are better handled in the background, and that is where message queues come in.
Imagine a video sharing platform. When you upload a video, the platform does not make you wait while it converts that video into multiple resolutions and generates thumbnails. Instead, it confirms your upload almost immediately, and the actual processing work gets placed as a message into a queue. A separate group of worker servers pulls tasks from that queue and processes them independently, at their own pace.
This decoupling has real benefits. If the workers are temporarily overwhelmed, tasks simply wait in the queue instead of causing the whole system to fail. If a worker crashes while processing a task, the task can be retried instead of being lost entirely. Tools like RabbitMQ and Apache Kafka are commonly used for this. Kafka in particular is built to handle enormous volumes of messages, which is why it is often used for things like tracking live location updates from thousands of delivery drivers at once, where writing every single update directly to a database in real time would overwhelm it.
Real world example: When you place an order on Amazon, the checkout confirms almost instantly, but behind the scenes, tasks like updating inventory counts, notifying the seller, and triggering the shipping process are handled asynchronously through queues, so the checkout page never has to wait on all of that to finish.
The CAP Theorem
Once your data is spread across multiple servers instead of just one, you run into an unavoidable tradeoff, formally described by the CAP theorem.
CAP stands for Consistency, Availability, and Partition Tolerance. Consistency means every server returns the exact same, most up to date data. Availability means the system always responds to requests, even if some servers are having problems. Partition tolerance means the system keeps working even if some servers temporarily cannot communicate with each other, which is bound to happen occasionally in any distributed system.
The theorem states you can only fully guarantee two of these three at once. Since network issues are inevitable in any real distributed system, partition tolerance is essentially non negotiable, which means the real decision usually comes down to choosing between consistency and availability when a partition happens.
A practical example, when you post something on social media, it might take a moment before all your followers around the world see it, since the update needs time to propagate across servers. The platform chose availability, staying responsive, over strict consistency, showing the absolute latest data to everyone instantly, because a slightly delayed post is a far better experience than the entire platform going down every time two servers briefly lose contact with each other.
As a general guide, systems dealing with money or critical transactions, like banking, tend to prioritize consistency. Systems like social feeds or product catalogs, where a slightly stale view is harmless, tend to prioritize availability.
Real world example: Dynamo, the internal database behind Amazon's shopping cart system (and the inspiration for DynamoDB), was famously designed to prioritize availability over strict consistency, because Amazon decided it was better for a customer's cart to always be accessible, even if it occasionally showed slightly outdated data, than for the cart to be completely unavailable during a network hiccup.
Proxies, Forward and Reverse
A proxy is simply a server that sits between a client and another server, and there are two kinds worth knowing.
A forward proxy sits in front of the client and makes requests on the client's behalf. A VPN is a common real world example, the destination server only sees the VPN's identity, not the actual user's. This is used for things like accessing region restricted content or letting an organization filter what websites its employees can reach.
A reverse proxy sits in front of a server, or a group of servers, and handles incoming requests on their behalf. The client only ever talks to the reverse proxy, never directly to the actual backend servers. Load balancers are a common example of a reverse proxy. Reverse proxies are also used for tasks like SSL termination, meaning they handle the encryption and decryption of secure traffic, taking that workload off the actual application servers, and for shielding backend servers from being directly exposed to the internet.
Real world example: Cloudflare commonly operates as a reverse proxy in front of millions of websites, absorbing traffic, filtering out malicious requests, and forwarding legitimate ones to the actual origin server, all while the origin server's real IP address stays hidden from the public internet.
How to Approach an HLD Problem, Step by Step
Knowing the building blocks is only half the battle. The other half is knowing how to actually approach a system design problem when you are given one, whether in an interview or on your own. Here is a framework that works well for beginners.
Step 1: Clarify the Requirements
Before drawing a single box, figure out what the system actually needs to do. If someone asks you to design something like an image sharing app, do not assume anything. Ask what the core features are, how many users the system needs to support, whether you need to support both uploading and viewing, and what matters most, speed, consistency, or cost.
Skipping this step is the most common mistake beginners make. Jumping straight into a solution before understanding the problem usually leads to a design that solves the wrong thing.
Step 2: Estimate the Scale
Once you know the requirements, think about rough numbers. How many users will use this system. How many requests per second is that likely to translate into. How much data will be stored over time.
You do not need exact numbers. The goal is to understand roughly what scale you are designing for, because a system built for a thousand users looks very different from one built for a hundred million users.
Step 3: Define the Core Components
Now start identifying the major pieces your system will need. This usually includes things like where data gets stored, whether you need caching, whether you need a queue for background tasks, and whether you need a CDN for delivering media.
At this stage, resist the urge to over engineer. Beginners often try to add every advanced tool they have heard of, even when the problem does not call for it. Start simple and only add complexity when there is a clear reason for it.
Step 4: Design the Data Flow
Walk through what happens step by step when a user interacts with your system. If a user uploads a photo, trace the path. The request hits a load balancer, gets routed to a server, the server stores the image somewhere, saves metadata to a database, and maybe triggers a background job to generate thumbnails.
Drawing this flow out, even roughly, helps you catch gaps in your design before they become real problems.
Step 5: Identify Bottlenecks and Failure Points
Ask yourself what happens if a server goes down, what happens if traffic suddenly spikes, and what part of the system is most likely to become a bottleneck as usage grows. This is where concepts like caching, horizontal scaling, and redundancy come back into play.
Thinking about failure early, rather than assuming everything will always work perfectly, is a habit that separates strong system design thinking from weak system design thinking.
Step 6: Discuss Tradeoffs
Almost every decision in system design comes with a tradeoff. Choosing a relational database over a NoSQL database might give you stronger consistency but weaker write performance at scale. Choosing to cache data aggressively might improve speed but introduce the risk of serving slightly outdated information.
Being able to explain why you made a choice, and what you gave up in return, matters more than picking the theoretically perfect answer. There often is no single correct answer in system design, only reasonable ones backed by clear thinking.
LLD Fundamentals, With Java Examples
1. Object Oriented Programming, The Foundation of LLD
Almost all LLD is built on top of object oriented programming, so before touching design patterns, you need a strong grip on its four core principles.
Encapsulation
Encapsulation means bundling data with the methods that operate on it, while keeping the internal state private and only exposing controlled access through methods.
public class BankAccount {
    private double balance; // private, hidden from outside

    public BankAccount(double initialBalance) {
        this.balance = initialBalance;
    }

    public void deposit(double amount) {
        if (amount > 0) {
            balance += amount;
        }
    }

    public void withdraw(double amount) {
        if (amount > 0 && amount <= balance) {
            balance -= amount;
        }
    }

    public double getBalance() {
        return balance;
    }
}
No outside class can directly change balance. Every change goes through deposit or withdraw, which enforce rules like not allowing a negative balance.
Abstraction
Abstraction means exposing a simple interface while hiding the complexity behind it.
public abstract class PaymentProcessor {
    public abstract void processPayment(double amount);
}

public class CreditCardProcessor extends PaymentProcessor {
    @Override
    public void processPayment(double amount) {
        // complex logic: contacting bank, verifying card, fraud check
        System.out.println("Processing credit card payment of " + amount);
    }
}
The class using PaymentProcessor just calls processPayment(amount). It has no idea about the bank verification or fraud checks happening underneath.
Inheritance
Inheritance lets a class reuse properties and behavior from a parent class.
public class Vehicle {
    protected String licensePlate;
    protected int capacity;

    public Vehicle(String licensePlate, int capacity) {
        this.licensePlate = licensePlate;
        this.capacity = capacity;
    }

    public void displayInfo() {
        System.out.println("Vehicle: " + licensePlate + ", Capacity: " + capacity);
    }
}

public class Car extends Vehicle {
    public Car(String licensePlate) {
        super(licensePlate, 4);
    }
}

public class Bike extends Vehicle {
    public Bike(String licensePlate) {
        super(licensePlate, 1);
    }
}
Car and Bike both reuse licensePlate, capacity, and displayInfo from Vehicle, instead of duplicating that code.
Polymorphism
Polymorphism means the same method call behaves differently depending on the object.
public class Vehicle {
    // licensePlate, capacity and the constructor, as above

    public double calculateFare(double distance, double time) {
        return 0;
    }
}

public class Car extends Vehicle {
    public Car(String licensePlate) {
        super(licensePlate, 4);
    }

    @Override
    public double calculateFare(double distance, double time) {
        return distance * 10 + time * 2;
    }
}

public class Bike extends Vehicle {
    public Bike(String licensePlate) {
        super(licensePlate, 1);
    }

    @Override
    public double calculateFare(double distance, double time) {
        return distance * 5;
    }
}
Vehicle v1 = new Car("KA01AB1234");
Vehicle v2 = new Bike("KA01XY5678");

System.out.println(v1.calculateFare(10, 20)); // 140.0
System.out.println(v2.calculateFare(10, 20)); // 50.0
Calling calculateFare on each object runs different logic depending on whether it is actually a Car or a Bike, even though the calling code does not need to know which one it is dealing with.
2. SOLID Principles, With Code
Single Responsibility Principle
A class should have only one reason to change, meaning it should do one thing and do it well. Imagine a class called Invoice that both calculates the total price and also handles printing the invoice to a PDF. If the printing logic needs to change, you are now touching a class that is also responsible for price calculation, which increases the risk of accidentally breaking something unrelated. The fix is to split it into two classes, one for calculating the invoice and another dedicated purely to printing it.
Bad, one class doing two jobs:
public class Invoice {
    public double calculateTotal(List<Item> items) {
        double total = 0;
        for (Item item : items) {
            total += item.getPrice();
        }
        return total;
    }

    public void printInvoice(List<Item> items) {
        // logic to print invoice as PDF
        System.out.println("Printing invoice...");
    }
}
Fixed, split into two responsibilities:
public class InvoiceCalculator {
    public double calculateTotal(List<Item> items) {
        double total = 0;
        for (Item item : items) {
            total += item.getPrice();
        }
        return total;
    }
}

public class InvoicePrinter {
    public void printInvoice(List<Item> items) {
        System.out.println("Printing invoice...");
    }
}
Open Closed Principle
A class should be open for extension but closed for modification. This means you should be able to add new functionality without changing existing, already tested code. Going back to the vehicle example, if you want to add a new vehicle type like Truck, you should be able to create a new Truck class that fits into the existing structure, rather than opening up the existing Vehicle class and modifying its core logic every time a new type is added.
Bad, modifying existing code to add a new type:
public class DiscountCalculator {
    public double calculateDiscount(String customerType, double amount) {
        if (customerType.equals("regular")) {
            return amount * 0.05;
        } else if (customerType.equals("premium")) {
            return amount * 0.10;
        }
        return 0;
    }
}
Fixed, extendable without touching existing code:
public interface DiscountStrategy {
    double calculate(double amount);
}

public class RegularCustomerDiscount implements DiscountStrategy {
    public double calculate(double amount) {
        return amount * 0.05;
    }
}

public class PremiumCustomerDiscount implements DiscountStrategy {
    public double calculate(double amount) {
        return amount * 0.10;
    }
}
Adding a new customer type now means adding a new class, not editing existing logic.
Liskov Substitution Principle
Objects of a child class should be replaceable with objects of the parent class without breaking the program. If you have a base class called Bird with a method called fly, and you create a subclass called Penguin that inherits from Bird, you have a problem, because a penguin cannot actually fly. If your code assumes any Bird object can fly, substituting in a Penguin object would break that assumption. This principle is a reminder to design your class hierarchies carefully, based on actual shared behavior, not just superficial similarity.
Bad, breaks the substitution rule:
public class Bird {
    public void fly() {
        System.out.println("Flying");
    }
}

public class Penguin extends Bird {
    @Override
    public void fly() {
        throw new UnsupportedOperationException("Penguins can't fly");
    }
}
Fixed, restructure the hierarchy to reflect actual behavior:
public abstract class Bird {
    public abstract void move();
}

public class Sparrow extends Bird {
    public void move() {
        System.out.println("Flying");
    }
}

public class Penguin extends Bird {
    public void move() {
        System.out.println("Swimming");
    }
}
Interface Segregation Principle
A class should not be forced to implement methods it does not use. Imagine an interface called Worker with methods work and eat. Now imagine you create a Robot class that implements Worker. A robot can work, but it does not eat, yet it would be forced to implement an eat method that does nothing meaningful. The fix is to split the interface into smaller, more specific ones, like Workable and Eatable, so classes only implement what actually applies to them.
Bad, forcing a class to implement methods it does not need:
public interface Worker {
    void work();
    void eat();
}

public class RobotWorker implements Worker {
    public void work() {
        System.out.println("Robot working");
    }

    public void eat() {
        // makes no sense for a robot
        throw new UnsupportedOperationException();
    }
}
Fixed, split into smaller interfaces:
public interface Workable {
    void work();
}

public interface Eatable {
    void eat();
}

public class RobotWorker implements Workable {
    public void work() {
        System.out.println("Robot working");
    }
}

public class HumanWorker implements Workable, Eatable {
    public void work() {
        System.out.println("Human working");
    }

    public void eat() {
        System.out.println("Human eating lunch");
    }
}
Dependency Inversion Principle
High level modules should not depend directly on low level modules. Both should depend on abstractions. Imagine a class called NotificationService that directly creates and depends on an EmailSender class. If you later want to send notifications through SMS instead, you would have to go back and modify NotificationService directly. Instead, if NotificationService depends on a generic interface called MessageSender, and both EmailSender and a new SmsSender implement that interface, you can swap in new notification methods without touching NotificationService at all.
Bad, tightly coupled to one specific implementation:
public class EmailSender {
    public void send(String message) {
        System.out.println("Sending email: " + message);
    }
}

public class NotificationService {
    private EmailSender emailSender = new EmailSender();

    public void notifyUser(String message) {
        emailSender.send(message);
    }
}
Fixed, depending on an abstraction instead:
public interface MessageSender {
    void send(String message);
}

public class EmailSender implements MessageSender {
    public void send(String message) {
        System.out.println("Sending email: " + message);
    }
}

public class SmsSender implements MessageSender {
    public void send(String message) {
        System.out.println("Sending SMS: " + message);
    }
}

public class NotificationService {
    private MessageSender messageSender;

    public NotificationService(MessageSender messageSender) {
        this.messageSender = messageSender;
    }

    public void notifyUser(String message) {
        messageSender.send(message);
    }
}
Now NotificationService works with any MessageSender, and switching from email to SMS requires zero changes to NotificationService itself.
Together, these five principles form the philosophy behind almost every design pattern, and most well structured codebases you will encounter follow them closely, even if the original developers never explicitly labeled them as SOLID.
3. Design Patterns, With Code
Design patterns are proven, reusable solutions to problems that come up repeatedly in software design. They are not rules you must follow blindly. They are more like a shared vocabulary among developers, a way to solve common problems using approaches that have already been tested and refined over time.
When you hear a developer say "just use a Factory here," they are not inventing something new. They are pointing to a well known, well understood solution for a specific type of problem, which saves everyone time and keeps the codebase consistent with patterns other developers will already recognize.
For a beginner, the most useful design patterns to start with are Singleton, Factory, Observer, Strategy, Decorator, and Builder. Let us go through each with a concrete example.
Singleton Pattern
This pattern ensures that only one instance of a class exists throughout the entire application, and provides a single, global point of access to it. A common example is a Logger class. You do not want multiple, separate logger instances scattered throughout your app, each potentially writing logs in a slightly different way or to a different location. A single, shared Logger instance ensures every part of your application logs consistently to the same place.
public class Logger {
    private static Logger instance;

    private Logger() {}

    public static Logger getInstance() {
        if (instance == null) {
            instance = new Logger();
        }
        return instance;
    }

    public void log(String message) {
        System.out.println("LOG: " + message);
    }
}
Logger.getInstance().log("Application started");
Every call to getInstance() returns the same shared object.
Note: this version is not thread-safe. Two threads calling getInstance() at the same moment can each create an object. In multi-threaded code, create the instance eagerly or use an enum.
Factory Pattern
This pattern is used when you need to create objects, but you do not want the calling code to know exactly which specific class is being instantiated. Imagine a notification system that can send notifications through Email, SMS, or Push Notification. Instead of the main code deciding which specific class to create every time, a NotificationFactory takes in a type, like "email" or "sms," and returns the correct object. This means if you add a new notification type later, you only update the factory, not every place in your code that creates notifications.
public interface Notification {
    void notifyUser();
}

public class EmailNotification implements Notification {
    public void notifyUser() {
        System.out.println("Sending Email Notification");
    }
}

public class SmsNotification implements Notification {
    public void notifyUser() {
        System.out.println("Sending SMS Notification");
    }
}

public class NotificationFactory {
    public static Notification createNotification(String type) {
        if (type.equalsIgnoreCase("email")) {
            return new EmailNotification();
        } else if (type.equalsIgnoreCase("sms")) {
            return new SmsNotification();
        }
        throw new IllegalArgumentException("Unknown type: " + type);
    }
}
Notification notification = NotificationFactory.createNotification("email");
notification.notifyUser();
The calling code never directly instantiates EmailNotification or SmsNotification. It just asks the factory for what it needs.
Observer Pattern
This pattern defines a one to many relationship, where when one object changes state, all its dependents get notified automatically. YouTube subscriptions are a perfect real world example. When a channel you are subscribed to uploads a new video, you get notified. You did not have to constantly check the channel yourself. You subscribed once, and the system notifies you automatically whenever there is an update. In code, the channel is the "subject" and each subscriber is an "observer" waiting to be notified of changes.
public interface Observer {
    void update(String videoTitle);
}

public class Subscriber implements Observer {
    private String name;

    public Subscriber(String name) {
        this.name = name;
    }

    public void update(String videoTitle) {
        System.out.println(name + " notified: New video - " + videoTitle);
    }
}

public class Channel {
    private List<Observer> subscribers = new ArrayList<>();

    public void subscribe(Observer observer) {
        subscribers.add(observer);
    }

    public void uploadVideo(String title) {
        for (Observer observer : subscribers) {
            observer.update(title);
        }
    }
}
Channel channel = new Channel();
channel.subscribe(new Subscriber("Harry"));
channel.subscribe(new Subscriber("Alex"));
channel.uploadVideo("System Design Basics");
Every subscribed observer automatically gets notified when the channel uploads a new video.
Strategy Pattern
This pattern allows you to define a family of algorithms, put each one in its own class, and make them interchangeable at runtime. Think about a shopping app that supports multiple payment methods, credit card, UPI, and wallet. Instead of writing a long chain of if else statements to decide which payment logic to run, each payment method becomes its own strategy class implementing a common interface. The checkout process simply calls the selected strategy's payment method, without caring about the internal details of how each one works.
public interface PaymentStrategy {
    void pay(double amount);
}

public class CreditCardPayment implements PaymentStrategy {
    public void pay(double amount) {
        System.out.println("Paid " + amount + " using Credit Card");
    }
}

public class UpiPayment implements PaymentStrategy {
    public void pay(double amount) {
        System.out.println("Paid " + amount + " using UPI");
    }
}

public class Checkout {
    private PaymentStrategy paymentStrategy;

    public Checkout(PaymentStrategy paymentStrategy) {
        this.paymentStrategy = paymentStrategy;
    }

    public void completePayment(double amount) {
        paymentStrategy.pay(amount);
    }
}
Checkout checkout = new Checkout(new UpiPayment());
checkout.completePayment(500);
Swapping payment methods just means passing a different strategy, no if else chains needed.
Decorator Pattern
This pattern allows you to add new behavior to an object dynamically, without altering its original structure. A well known example is a coffee ordering system. You start with a base Coffee object, and then you can wrap it with decorators like Milk, Sugar, or WhippedCream, each adding to the cost and description without modifying the original Coffee class itself. This is far more flexible than creating a separate class for every single possible combination of coffee and toppings.
public interface Coffee {
    double getCost();
    String getDescription();
}

public class BasicCoffee implements Coffee {
    public double getCost() {
        return 50;
    }

    public String getDescription() {
        return "Coffee";
    }
}

public abstract class CoffeeDecorator implements Coffee {
    protected Coffee decoratedCoffee;

    public CoffeeDecorator(Coffee coffee) {
        this.decoratedCoffee = coffee;
    }
}

public class MilkDecorator extends CoffeeDecorator {
    public MilkDecorator(Coffee coffee) {
        super(coffee);
    }

    public double getCost() {
        return decoratedCoffee.getCost() + 10;
    }

    public String getDescription() {
        return decoratedCoffee.getDescription() + " with Milk";
    }
}
Coffee order = new MilkDecorator(new BasicCoffee());
System.out.println(order.getDescription() + " costs " + order.getCost());
Each decorator wraps the base object, adding cost and description without touching the original BasicCoffee class.
Builder Pattern
This pattern is useful when an object requires many optional parameters, and creating it through a constructor with a dozen arguments becomes messy and error prone. Imagine building a custom computer with options for CPU, RAM, storage, and GPU, where many of these are optional. A Builder lets you construct the object step by step, setting only the parameters you actually care about, and calling a final build method to get the finished object, which keeps the object creation process readable and flexible.
public class Computer {
    private String cpu;
    private int ram;
    private int storage;
    private String gpu;

    private Computer(Builder builder) {
        this.cpu = builder.cpu;
        this.ram = builder.ram;
        this.storage = builder.storage;
        this.gpu = builder.gpu;
    }

    public static class Builder {
        private String cpu;
        private int ram;
        private int storage;
        private String gpu;

        public Builder setCpu(String cpu) {
            this.cpu = cpu;
            return this;
        }

        public Builder setRam(int ram) {
            this.ram = ram;
            return this;
        }

        public Builder setStorage(int storage) {
            this.storage = storage;
            return this;
        }

        public Builder setGpu(String gpu) {
            this.gpu = gpu;
            return this;
        }

        public Computer build() {
            return new Computer(this);
        }
    }
}
Computer myComputer = new Computer.Builder()
        .setCpu("Intel i7")
        .setRam(16)
        .setGpu("RTX 4060")
        .build();
You only set the fields you care about, and the final build() call assembles the object cleanly, instead of a constructor with a long list of parameters.
UML and Class Diagrams
Before writing a single line of code in an LLD problem, experienced engineers sketch out their design visually first. The standard visual language used for this is UML, which stands for Unified Modeling Language. UML is not code, and it is not a programming language. It is a standardized set of symbols and diagram types that let you represent a system's structure and behavior on paper or a whiteboard, so anyone familiar with UML can look at your diagram and immediately understand how your classes are organized, without reading a single line of code.
As a beginner, you do not need to master every type of UML diagram that exists. What actually matters for LLD is understanding class diagrams deeply, since that is the diagram type you will use constantly, both in interviews and in real projects.
Why UML Matters, Even Though It Feels Like Extra Work
It is tempting to skip diagramming and jump straight into code, especially when you already have a rough idea in your head. This almost always backfires once the problem has more than three or four classes. A class diagram forces you to make decisions about structure and relationships before you are deep into implementation details, which is exactly when mistakes are cheapest to fix. Catching a broken relationship on a whiteboard takes ten seconds. Catching the same mistake after writing two hundred lines of code can mean rewriting a significant chunk of your project.
There is also a communication benefit. In a real engineering team, a class diagram is often the fastest way to get everyone aligned on a design before anyone touches an IDE. It becomes a shared reference point that avoids the ambiguity of describing a class structure purely in words.
The Building Blocks of a Class Diagram
A class diagram represents each class as a rectangle, split into three sections stacked on top of each other.
- The top section contains the class name.
- The middle section lists the class's attributes, meaning its fields or properties, along with their data types.
- The bottom section lists the class's methods, meaning its functions, along with their parameters and return types.
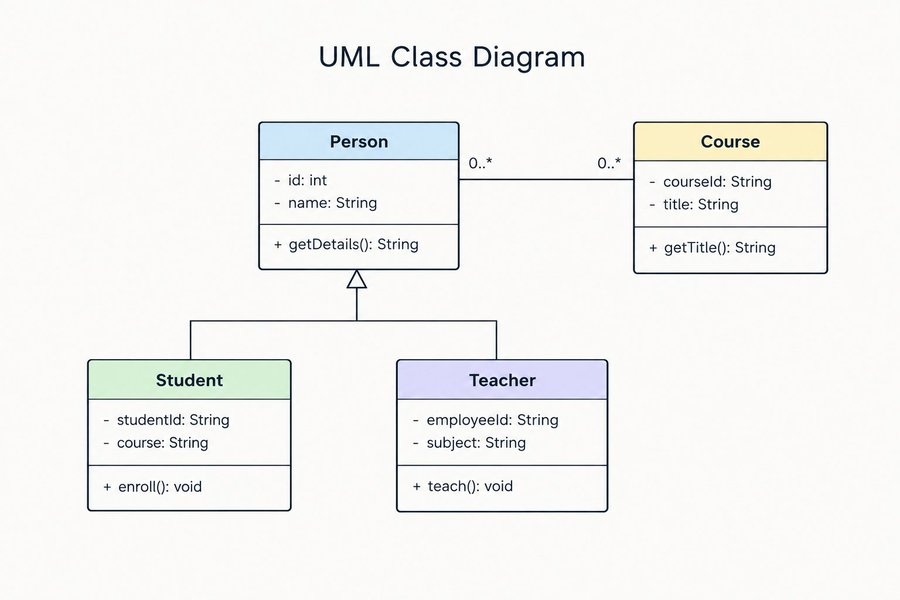
Notice the small symbols before each attribute and method. These are visibility markers, and they matter because they tell you how accessible each member is from outside the class.
- A minus sign,
-, means the member is private, accessible only within the class itself. - A plus sign,
+, means the member is public, accessible from anywhere. - A hash symbol,
#, means the member is protected, accessible within the class and its subclasses. - A tilde,
~, means the member has package or default visibility, accessible only within the same package.
Once you get comfortable reading these symbols, you can look at any class diagram and immediately understand which parts of a class are meant to be used externally and which parts are meant to stay hidden, which directly reflects the encapsulation principle covered earlier.
The Relationships Between Classes
The real value of a class diagram comes from showing how classes relate to each other, not just what each class contains individually. There are several distinct types of relationships, and beginners often blur them together, so it is worth understanding each one clearly.
Association
Association is the most general relationship, representing that one class uses or is connected to another in some way. It is drawn as a simple straight line between two class boxes. For example, a Teacher class and a Student class might have an association if a Teacher can be linked to a Student, but neither one owns or controls the other's lifecycle. If the Teacher object is destroyed, the Student object still continues to exist independently.
Aggregation
Aggregation is a special, weaker form of association, representing a "has a" relationship where one class contains another, but the contained object can exist independently. It is drawn as a line with an open, unfilled diamond on the side of the containing class. A good example is a Department class containing multiple Professor objects. If the Department is dissolved, the Professor objects do not cease to exist, they can move to another department. This independence is what makes it aggregation rather than the next relationship.
Composition
Composition is a stronger form of the "has a" relationship, where the contained object's lifecycle is entirely tied to the container. It is drawn as a line with a filled, solid diamond on the side of the containing class. A classic example is a House class containing Room objects. A Room does not meaningfully exist outside of the House it belongs to. If the House object is destroyed, its Room objects are destroyed along with it. This distinction between aggregation and composition often trips up beginners, but the test is simple, ask whether the contained object can meaningfully exist on its own if the container disappears. If yes, it is aggregation. If no, it is composition.
Inheritance, or Generalization
Inheritance represents an "is a" relationship, where one class is a specialized version of another. It is drawn as a line with a hollow, unfilled triangle arrow pointing toward the parent class. Going back to an earlier example, if Car and Bike both inherit from Vehicle, you would draw a line from Car to Vehicle and a separate line from Bike to Vehicle, each with the hollow triangle pointing up toward Vehicle, indicating that both Car and Bike are specialized types of Vehicle.
Realization, or Implementation
Realization represents the relationship between a class and an interface it implements. It is drawn as a dashed line with a hollow triangle arrow pointing toward the interface. If a class called EmailSender implements an interface called MessageSender, you would draw a dashed line from EmailSender to MessageSender, with the hollow triangle pointing at MessageSender. The dashed line specifically signals that this is an interface implementation rather than a direct inheritance from a concrete class.
Dependency
Dependency is the weakest and most temporary relationship, representing that one class uses another only briefly, often just as a parameter in a method, without holding a lasting reference to it. It is drawn as a dashed line with a simple open arrow. For example, if an OrderService class has a method that accepts a Logger object as a parameter just to log something during that one method call, without storing the Logger permanently as a field, that is a dependency rather than an association.
Multiplicity, Describing How Many
Class diagrams also describe how many instances of one class relate to how many instances of another, using small numbers or symbols placed near each end of a relationship line. This is called multiplicity.
- A
1means exactly one instance is involved. - A
0..1means zero or one instance, meaning the relationship is optional. - A
*or0..*means zero or many instances. - A
1..*means at least one, but possibly many.
For example, if a ParkingLot contains multiple ParkingSpot objects, you would draw the association between them with a 1 near the ParkingLot side and a 1..* near the ParkingSpot side, indicating that one parking lot can have one or more parking spots, but each spot belongs to exactly one parking lot.
A Worked Example
Let us bring all of this together using the Parking Lot example from earlier. A simplified class diagram description would look like this.
ParkingLothas a composition relationship withParkingSpot, since parking spots do not meaningfully exist without belonging to a specific parking lot, and this relationship is one ParkingLot to many ParkingSpot objects.Car,Bike, andTruckall have an inheritance relationship with a baseVehicleclass, shown with hollow triangle arrows pointing up toward Vehicle.ParkingSpothas an association withVehicle, since a spot can be occupied by a vehicle, but a vehicle can exist independently of any specific spot, for example while it is still on the road.Tickethas an association with bothVehicleandParkingSpot, since a ticket references which vehicle is parked in which spot, without owning either of them.ParkingLothas a dependency on aPaymentStrategyinterface, since it briefly uses whichever payment strategy is selected to calculate a fee, without permanently holding onto one specific implementation.
Sketching this out visually before writing any Java code makes the entire structure immediately clear, and it becomes far easier to spot a mistake, like realizing Ticket is missing a reference to ParkingSpot, while looking at boxes and arrows rather than after the code is already halfway written.
Common Beginner Mistakes with UML
A few mistakes come up repeatedly when beginners start using class diagrams.
- Confusing aggregation and composition is extremely common. When unsure, always fall back to the independent existence test described earlier.
- Overusing inheritance is another frequent mistake. Beginners sometimes reach for inheritance whenever two classes share a few similar fields, even when there is no true "is a" relationship. If the relationship does not hold up logically, like the earlier Penguin and Bird example, association or composition is usually the better choice.
- Trying to diagram everything in a system at once is also a common trap. In practice, especially during an interview, you only need to diagram the core classes relevant to the problem at hand, not every conceivable class and edge case up front.
Tools for Drawing UML Diagrams
You do not need special software to benefit from UML thinking. A whiteboard, a piece of paper, or a simple drawing tool works perfectly well, especially in an interview setting where you are expected to sketch quickly rather than produce a polished diagram. For personal practice or documentation, tools like draw.io, Lucidchart, or even plain text based tools like PlantUML let you create cleaner diagrams that are easy to update as your design evolves.
The specific tool matters far less than the habit itself. What separates strong LLD thinking from weak LLD thinking is not knowing every UML symbol by heart, it is consistently pausing to sketch relationships before writing code, and using that sketch to catch structural problems while they are still cheap to fix.
How to Approach an LLD Problem, Step by Step
Knowing OOP principles, SOLID, and design patterns is the theory. The harder part for most beginners is actually applying that theory when given a fresh problem, like "design a parking lot" or "design a vending machine." Here is a framework that works well, along with a running example so you can see how each step plays out in practice.
Let us use a common beginner LLD problem as our example throughout, designing a Parking Lot system.
Step 1: Clarify the Requirements
Just like HLD, LLD starts with understanding the problem, not jumping straight into classes. For a parking lot system, you would want to clarify things like, does the lot have different spot sizes for motorcycles, cars, and trucks, does the system need to calculate parking fees, does it need to track how many spots are available, and does it need to support multiple entry and exit points.
Skipping this step often leads to designing classes for a problem that is not actually the one being asked. A parking lot with a flat fee structure looks very different in code from one with time based, vehicle type based pricing.
Step 2: Identify the Core Objects, or Entities
Once requirements are clear, start listing the real world things involved in the problem. For the parking lot, this would likely include Vehicle, ParkingSpot, ParkingLot, Ticket, and Payment.
A helpful trick here is to think of these as nouns from the problem description. Whenever you can point to a distinct "thing" in the system that has its own data and behavior, it is probably a candidate to become a class.
Step 3: Define Relationships Between Objects
Now figure out how these objects relate to each other. Does a ParkingLot contain multiple ParkingSpot objects. Does a Vehicle get assigned to exactly one ParkingSpot at a time. Does a Ticket get generated when a Vehicle enters, and get closed when it exits.
This is where composition and inheritance decisions get made. For example, you might decide that Car, Bike, and Truck all inherit from a base Vehicle class, since they share common properties like license plate and vehicle type, but differ in specific behavior like which spot sizes they can occupy.
Step 4: Identify Behaviors and Assign Responsibilities
For each class, define what it actually needs to do. A ParkingLot might need a method to find an available spot and assign it to an incoming vehicle. A ParkingSpot might need a method to mark itself as occupied or free. A Ticket might need a method to calculate the final fee based on how long the vehicle was parked.
This is also where the Single Responsibility Principle becomes important. It is tempting to dump all the logic into one giant ParkingLot class, but a well designed system spreads responsibility across classes so that each one has a clear, focused job.
Step 5: Apply Relevant Design Patterns
Once the basic structure is in place, look for places where a design pattern naturally fits. In the parking lot example, if there are multiple ways to calculate a fee, like hourly rate versus a flat rate, the Strategy pattern fits well, letting you swap fee calculation logic without changing the core ParkingLot class.
If the system only needs a single, shared instance managing the entire parking lot's state, the Singleton pattern might apply to the ParkingLot class itself.
Do not force a pattern where it does not naturally belong. A common beginner mistake is trying to use as many patterns as possible to look impressive, when a simpler, pattern free solution would actually be cleaner. Patterns should solve a real problem in your design, not be added for the sake of using them.
Step 6: Sketch It Out Before Coding
Before writing any actual code, sketch a rough class diagram. List each class, its key attributes, and its key methods. This does not need to be a formal UML diagram, even a simple box and arrow sketch on paper works.
This step catches structural problems early. It is far easier to notice that your Ticket class is missing a reference back to the Vehicle it belongs to when you are looking at a quick sketch, rather than after you have already written fifty lines of code around a flawed structure.
Step 7: Write Clean, Incremental Code
Finally, translate your design into code, one class at a time, starting with the simplest and most foundational classes first, like Vehicle, before moving to classes that depend on them, like ParkingSpot and then ParkingLot.
As you write, keep checking your code against SOLID principles. Ask yourself if a class is doing too much, if you are hardcoding something that should be flexible, and if adding a new feature later, like a new vehicle type or a new pricing model, would require rewriting existing code or simply adding new code alongside it.
Step 8: Handle Edge Cases
Once the core design works, think through edge cases. What happens if the parking lot is completely full and a new vehicle arrives. What happens if a ticket is lost. What happens if two vehicles somehow get assigned to the same spot due to a timing issue.
Thinking through these scenarios, even briefly, shows a level of maturity in your design thinking that goes beyond just getting the happy path to work.
A Beginner's Practice Roadmap
Knowing the concepts is one thing. Knowing what order to learn them in, and how to actually practice, is what turns theory into a usable skill. Here is a roadmap that avoids the common trap of trying to learn everything at once.
Stage 1: Build the Vocabulary First
Before attempting any design problems, spend time purely understanding the building blocks. Servers, load balancers, databases, caching, CDNs, message queues. Do not try to design anything yet. Just make sure that when someone says "we cached this at the edge" or "the write goes to the master node," you know exactly what that means without having to pause and think.
A good way to test yourself here is to explain each concept out loud, in plain language, as if you were teaching a friend who knows nothing about it. If you struggle to explain something simply, that is a sign you have memorized the term without actually understanding it.
Stage 2: Study Simple, Well Known Systems
Once the vocabulary feels comfortable, start reading how real systems are designed at a high level. Look at simplified breakdowns of how a URL shortener works, how a rate limiter works, how a basic chat application works. These are intentionally smaller in scope than something like designing all of Instagram, which makes them a much better starting point.
At this stage, you are not designing anything yourself yet, you are pattern matching. You are noticing how the same building blocks, caching, load balancing, queues, keep showing up in different combinations depending on the problem.
Stage 3: Attempt Your Own Designs, Badly at First
Now start attempting to design simple systems yourself before looking at the solution. Pick something like a URL shortener or a basic notification system, and walk through the framework, clarify requirements, estimate scale, define components, design the data flow, before checking how others have solved it.
Your first few attempts will likely be rough, and that is expected. The value is not in getting it right immediately, it is in forcing yourself to make decisions and justify them, which is exactly what happens in a real interview or a real job.
Stage 4: Move to LLD in Parallel
Do not wait until HLD feels mastered before starting LLD. Begin practicing LLD problems alongside your HLD practice, since the two skills reinforce each other. Start with classic beginner LLD problems, a parking lot system, a vending machine, a library management system, and actually write the code, not just the diagrams.
Focus specifically on applying SOLID principles and picking design patterns only when they genuinely solve a problem in your design, not because you are trying to check a box. Writing the code, even messy code at first, builds an intuition that reading about patterns alone never will.
Stage 5: Study Harder, More Specific Systems
Once the fundamentals feel solid on both sides, move to more complex, well known systems. Design something like Twitter, Netflix, or a ride sharing app. These problems force you to combine multiple concepts at once, database sharding alongside caching alongside message queues, which is where real system design thinking starts to develop.
Stage 6: Practice Explaining Your Design, Not Just Building It
A design that lives only in your head is not finished. Practice explaining your design out loud, including the tradeoffs you made and why. If you chose NoSQL over SQL for a particular component, be ready to explain exactly why, and what you gave up by making that choice. This matters just as much in interviews as it does in real engineering discussions with a team, where you constantly have to justify decisions to other people.
A Note on Pacing
Do not rush through these stages in a week. System design is a skill built through repeated exposure over time, not a single weekend of reading. Revisiting the same concepts a few weeks apart, once you have more context, often teaches you more than reading them once carefully the first time.
Ending Notes
System design can feel like an impossibly large field when you are just starting out, mostly because most resources throw you into the deep end without ever building the foundation first. Hopefully this guide did the opposite.
You now understand the split between HLD and LLD, and why both matter. On the HLD side, you have a real grasp of the building blocks, servers, load balancers, databases, caching, CDNs, message queues, scaling, and the tradeoffs that come with each of them. On the LLD side, you understand the object oriented principles, the SOLID principles, and the common design patterns that keep code clean and maintainable as it grows.
None of this makes you a system design expert overnight, and that was never the goal. What it gives you is a map, a clear sense of where to start, what to learn next, and how the pieces fit together. From here, the only way forward is practice. Pick a simple system, attempt to design it badly, learn from where it breaks, and try again. That repeated cycle, far more than reading any single article, is what actually builds this skill over time.
If you found this useful, the best next step is to stop reading and start designing something, even something small. That is where the real learning begins.